Showing posts with label Blogging-Tips. Show all posts

How to Verify a Blog on Alexa?


Step by step guidelines about to Submit a Website/Blog to Alexa

How to Verify a Blog on Alexa?

Here we are going to explain you the whole process of submitting of a blog/website to Alexa. Alexa is a basically a ranking tool like other tools . It take all websites at its own better its a better decision to submit your website a confirmed your owner ship to alexa so that you can add more details about your website in alexa profile and make it look like a professional.

Alexa is a standards and everyone wants to make sure that his blog gets a better listing and ranking on alexa. so this post will help you in submission of your site and claim your site ownership. and always easy to check your ranking through alexa. Alexa is a great websites have one of the top websites which rank websites globally and it also show ranking of website in various factors like website global rank, its country base ranking , search queries and many more details. It provide a lot of information to judge any of website over the internet. Many people also use it as a tool to check ranking of any website.

If you still have no website/blog the learn
make your own website and make money

Claiming your site in Alexa:


Step by step guide to Submit Website/Blog to Alexa:


Step 1:

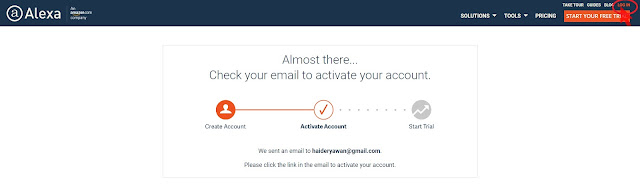
Go to the Alexa.com and creates your account.
Here you can either login with your existing Facebook account or signup as a new custom with gmail ID. I recommended a new custom account.

Step 2:

Now for submit the site to Alexa, You click on certify you site metrics, It will open a new popup windows which says: Certified your site metric that means directly measured from you website instead of any estimate. In this step you should installed Alexa certify code on the page of your website/blog and chosen to show metrics publicly. 

With this metric alexa estimate your website ranking with great accuracy by making private metrics dashboard for on-site analytics and have the ability to count unique visitor and page view count as you desired. you should select plans and pricing page you can also get a free trial for limited time offer.


After creating a free alexa account you will see three option to verify your website.

Option 1:

Upload an Alexa verification file to you site's root directory

Option 2:

Add an Alexa verification ID to your homepage

Option 3:

Certify your site's metric (This is only available in Alexa Pro "upgraded users"


Alexa offers a lot of plans for professional but for the normal bloggers or new users a free plan is good to start and search available fictions. But if you have a serious and 

professional businessman you should select a paid plan which have a great plans for the ranking and up gradation of your website.

Now the time is Claiming site in Alexa:

This all process is Similar to Google domain verification process, No matter you are using which theme simply upload a file or add a meta tag to claim our domain to alexa. You can pick any of the method as you like, (Upload a verification file to root of your domain or add meta tag in head section of your site.
Most simple is go the the Scripts and add the complete verification code with meta name there.

Like this : <meta name=”alexaVerifyID” content=”xxxxxxxxxxxxxxxxx” />

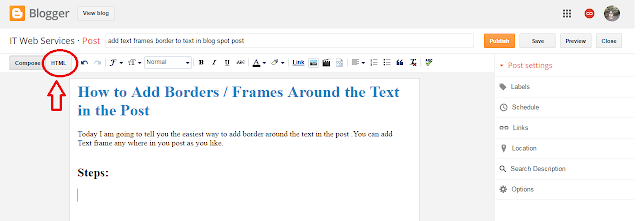
Make sure to clear your cache if you are using any cache plugin, and than click on verify the site. Blog Spot Bloggers can add the code in their template and follow the same, If you have done everything right here, click on verify the process and you will see a successfully claimed message.

Its a better decission for the ranking and traffic of your website to submit your website to more sites like Alexa you also send your site to google which give you a lot of support in ranking of your website.


By Clicking on Continue and you can edit many important details regarding your website/blog. You will notice many parts will be locked because you are using a trial account, as you need to get a premium Alexa account, for editing the complete listing and using of all tools. Initially you should ignore all this. now:

When Submission process of website successfully completed to Alexa click on don and save than continue your website details will be updated on the Alexa now. with the free Alexa account you will see a lot of limitations but if you are starter than its no mater for you because for blogger this is their learning time and a free account can also support you a lot than a lot as they shift to their professional work they can create a paid account with all options available..

Though, It's very nice to submit your blog and website to Alexa as wel as other similar popular sites so that you can improve your website ranking and get more and more traffic.

How to Change Email Address of Blogger


How to Change Email Address of Blogger ?

How to Change Owner Ship of a Blogger?

How to Shift Blogger to another Email Address ?

How to Transfer Owner Ship of a Blogger ?

Transfer Blogger to Another Gmail Account


Google Provide best service to create a blogger and its totally free, and you need only a Gmail ID for creating a new blogger.First of All you have a Google Account if you not have Go to Google Server and First make a new ID.

Today over topic is how to transfer a ownership of a blogger.Usually blogger don't permit it directly but still there is a way available by using of which you can easily change your primary email id .There are many reason for what people change login email address of there blogger.

How to Change Email Address of Blogger ?


Some of the possible reasons are following, 

Reason 1 :
Many of new bloggers usually create their blog with a random email id and later on they feel that there blog should have been associated with something that looks more genuine. In case of  that they change their blogger login email address.

Reason 2.:

Some time you have more than one blog and these blogs are attached with different email address, It becomes very difficult task to manage these all accounts.So its a easy way to change the login email id of all blogger to one ID in this way you can manage all your blogs in the same dashboard.

Reason 3:

You have approved  AdSense account of another email id and you want your blog to be associated with that email id.


Simple Steps For Change Email Address of Blogger

Login to your Blogger account for which you want to change your login email id.

Step 1:

Go to Blogger Dashboard ==>  Settings  ==> Basics.


 In Permissions section, you will find the blog authors.


Click on Add Authors button and enter an Email address where you want to transfer owner ship o0f your blogger. It will send an author invite to the new email address which you want to switch to.

Step 2:

Now login to your second email address.You would have received an author invitation in your second email address. Now accept it.

Step 3:

When you accepted the invitation. (In this step your second email address is added as a author not as a admin)

Step 4:

 Now Login to blogger with the old Email id, you will see the other email address as a new author. Change the role of new email address from Author to Admin.


Step 5:

The last step. Login to blogger account from your new  email address. You will see the blog in your dashboard with Admin power.

Go to Settings ==> Basic and remove the old email address from the Blog Authors from Permission.

Thats all ! 

I hope you will enjoy our post . Please write you comments if it is help full for you.

Submit Blogger Sitemap To Google Webmaster Tool


How to Submit Blogger Sitemap To Google Webmaster Tools?

Today our topic is about submitting of sitemap to google webmaster tools for better crawl of your site.For the successful blogging career everyone must have to generate decent organic traffic to his blog.Today we are going to tell you a easiest way to submit your blogger sitemap to google webmaster tools for the purpose of gaining more traffic.

Webmaster is a great tool provided by google itself.specilly use for submitte your website or blogger index to the Google and it always help in imporving the crawling rate of a website or blogger.For submitting sitemap you just need to verify your ownership of website to google webmaster tools and then submit a simple sitemap. In the term SEO submittion of sitemap is very important.


How to Create and Submit Sitemap to Google Webmaster Tool
Submit Blogger Sitemap To Google Webmaster Tool

Following are the easy steps you have to adopt in submission of sitemap to Google Webmaster tool


Steps for Adding Your blogger in the Google Webmaster Tools

Step 1:


Login to Google Webmaster Tools with your G-mail ID


Give the user id password here


Step 2:

After login click on the ADD PROPERTY button for linking your blog or website with google webmaster tool


 In the next windows enter the URL of your website or blog as shown bellow

Step 3:

Here a new windows will be opened asking you for verifying your domain. Many option available here for you to verify your website or blogger.


Copy the code login your blog click on ==> "Template"  ==>  "Edit HTML"


Past codes after the <HEAD> in the HTML codes of blog and click on the verify button in the Google webmaster tools.
You will see the following massage after verifying.


Click on Continue

Steps For Sending Blogger Sitemap in the Google Webmaster Tools


Step 1:

After Login your webmaster tools account with your G-mail ID,Click on view all and than click on the your website or blogger name as shown in the picture


Step 2:

Click on the Sitmaps as shown in the picture


Step 4:

Click on the ADD/Test Sitemap button


Step 5:

As you click on the ADD/Test Sitemap button, a new box will be opened as shown in the picture.
Add the below code in the text field.


Codes:

atom.xml?redirect=false&start-index=1&max-results=500

Step 6:

Now press on "Submit" Button.
once refresh the page.

Thats All !

The submission process of the sitemap is completed now

Important Note : This sitemap will be work only for those blogs which have only 500 posts.If your blogger have more than 500 post than you do the same process once again and this time enter the code

atom.xml?redirect=false&start-index=501&max-results=1000


Here i explain you one more thing sitemap have two formats on is XML (used by the search engines to find easily contents of blog) and second format is HTML (use for our blog readers so that reader can read all blogs post easily at one place.

Thanks a lot !
If you thing this post is helpfull for you share it with your friends and if you still feel any problem you can ask in the comments.

add border frame to text in post


How to Add Borders / Frames Around the Text in the Post

Today I am going to tell you the easiest way to add border around the text in the post .You can add Text frame any where in you post as you like.

Steps:

1.   While writing you post click on HTML tab

border or frame round the text in post


2.   Past the code for border or text frame.

how to add text box in blog

Codes:-


<div style="
border: solid 5px #aaaaaa;
background: #FF93E7;
font-size: 18px;
margin: 40px;
padding: 30px;
text-align: justify;
">
Type Your Text Here
</div>
The Text Line After the Border.


When you click on Compose tab to see how it look like in the post it will look like this.
Type Your Text Here
The Text Line After the Border.


Note:
              You can change border, background, font-size, margin,padding,text align,any thing you want only by changing the volue for example if you want to change font size to large size change 18px to 20px or 24px or as you like.
If you not want to give background color only delete the background entry.


Examples with Codes:


<div style="
border: solid 10px #aaaaaa;
font-size: 18px;
margin: 40px;
padding: 30px;
text-align: justify;
">
Type Your Text Here
</div>
<div style="
border: dashed 5px #aaaaaa;
font-size: 18px;
margin: 40px;
padding: 30px;
text-align: justify;
">
Type Your Text Here
</div>
<div style="
border: dotted 5px #aaaaaa;
font-size: 18px;
margin: 40px;
padding: 30px;
text-align: justify;
">
Type Your Text Here
</div>
<div style="
border: solid 5px #aaaaaa;
font-size: 18px;
margin: 40px;
padding: 30px;
text-align: justify;
">
Type Your Text Here
</div>
<div style="
border: groove 5px #aaaaaa;
font-size: 18px;
margin: 40px;
padding: 30px;
text-align: justify;
">
Type Your Text Here
</div>
<div style="
border: ridge 5px #aaaaaa;
font-size: 18px;
margin: 40px;
padding: 30px;
text-align: justify;
">
Type Your Text Here
</div>
<div style="
border: double 5px #aaaaaa;
font-size: 18px;
margin: 40px;
padding: 30px;
text-align: justify;
">
Type Your Text Here
</div>
<div style="
border: inset 5px #aaaaaa;
font-size: 18px;
margin: 40px;
padding: 30px;
text-align: justify;
">
Type Your Text Here
</div>

This post is for you if you are a blogger and looking for text border to impliment on your blog.

thanks a lot.

How to create a free google blogger?

How to create a Blog

Create a free website blogger?


Create a blog?

You can create and manage your own blog with Blogger.its totally free and you can save all your information online. You can share your feeling , your information, improve your business its very easy and free for all yours


Steps for Create a blog

1. Sign in to Blogger.
Click on
  https://www.blogger.com/about/
if you have gmail account you can directly create it but if you not have first create a gmail id.
2. On the left, click the Down arrow Down Arrow.
3. Click New blog.
4. Enter a name for your blog.
5. Choose a blog address, or URL.
6. Choose a template.
7. Click Create blog.

That's it

in case of any query you can asked any question in the comments box

After creation of blogger you can post it picture, information etc.
how to login
Click on
  https://www.blogger.com/about/

If you want to give access to other to upload post on your blog

Let others edit your blog
Step 1: Sign in to Blogger with gmail id.
Step 2: In the top left, click the Down arrow Down arrow.
Step 3: Select the blog to update.
Step 4: In the left menu, click Settings and then Basic.
Step 5: Under "Permissions," find "Blog Authors" and click Add authors.
Step 6: Enter the email address of the person you want to add.
Step 7: Click Invite authors.
Step 8: After they accept the invitation, they'll be listed as an author. You can add up to 100 total members (authors, administrators, or readers) to your blog.

Are Text to HTML Ratios Important for SEO and search engin?

Are Text to HTML Ratios Important for SEO and search engine?


First we explain to you What is a Text to HTML Ratio?


Most web pages are written in HTML code that is used to display the page content (usually text). A page's text to HTML ratio measures the amount of text on that page compared to the amount of HTML code needed to display it.This includes all setting of your font, image tag etc.

What is the Ideal Ratio of HTML to Text?

It is a very important question what is good ratio for SEO? a good percentage between HTML code and text? A good text to HTML ratio is anywhere from 25 to 70 percent. This percentage refers to the visible text ratio, as compare to HTML elements, image tags and other non-visible information of the whole page. You may notice that many high ranking websites in search results have visible text.The amount of text give your site a good look as well as its seem to search engine that this site have real information for users, in this way search engine give more chance to these site for high ranking.This has become especially apparent since search engines, such as Google.

How Does it Affect on SEO of website?

The text to HTML ratio is not a direct ranking factor for search engines but there are many factors related to this ratio such as it indicates best SEO practices and thus may indirectly result in higher search rankings of your site so always try to right a good article having more text so that seach engin may take it in a good way.

How to improve code to text ratio of your website?


Built for users:-
Web pages with more text content to HTML tend to be more readable and understandable for people. It gives the impression that the site is built in a way to provide information to the people rather than only for the search engines and so it seems important in the eyes of the search engines as wel as the users.

Better User Experience:-

More text than code ratio is indicate a good user experience, and better user experience has become a prime search ranking factor according to Google and other search engines and search ranking is most important for blogger than anything so always keep in mind this point before uploading any post.

Less codes Better Page Load Speed:-

Less code indicates that any unnecessary HTML elements are not present in the code of a web page. This increases the loading speed of the your page which indicates better user experience and again is a significant search engine ranking factor.Search engine also give it important in raking.

Better Indexing of Pages:-

A cleaner code and higher ratio of plain text makes it easier for search engines to crawl and index the site.
Now i am going to tell you,How Do You Create a Page with a High Text to HTML Ratio?

The key to optimizing of your web page is to build it focusing on user-experience. Follow these tips to optimize your page’s text to HTML ratio and increase user-experience:

Point 1
Check if your HTML code is valid
Point 2
Remove any unnecessary code
Point 3
Remove huge white spaces
Point 4
Avoid lots of tabs
Point 5
Remove comments in the code
Point 6
Avoid tables. Use tables in your layout only if absolutely necessary
Point 7
Use CSS for styling and formatting
Point 8
Resize your images
Point 9
Remove any unnecessary images
Point 10
Only use JavaScript and flash if required
Point 11
Keep the size of your page under 300 kb
Point 12
Remove any hidden text that is not visible to people
Point 13
Use internal linking to help users navigate your site & make sure your links pass link juice
Your page must always have some amount of plain text. so that its show that the website is providing a good information.